In this tutorial, we will see how to schedule inspections. The "Scheduled inspections" tab can contains one or many different inspection forms (click here to read the article explaining how to create inspection forms). Those inspection forms can be printed out to employees or they can be completed on screen. When you fill out an inspection form on screen, a "Completed inspection" is created and "Issues" are created from the "Failed" items. Those "Issues" can then be converted to "Work orders" or "Completed services".
To create and manage the scheduled inspections for a vehicle, go to the vehicle view, select a vehicle then click on the "Scheduled inspections" tab: 
There is actually no scheduled inspections. Let's create one: 
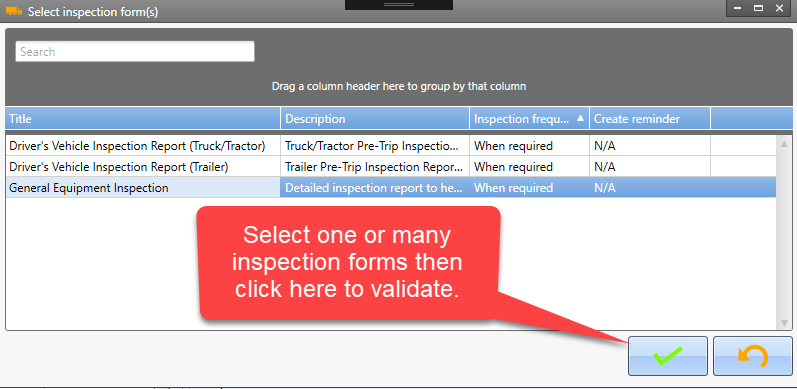
You now have an inspection form in your "Scheduled inspections". The grid "Inspection items" contains items that belongs to the selected inspection form: 
More details about this grid:
- Title : The title of the inspection form. When printing out the form, it will be displayed at the top.
- Description : The detailed description of this inspection form. It may be displayed as a subtitle when the proper printing option is set.
- Inspection frequency : The frequency at which this inspection should be performed.
- Last performed: The date this inspection was last performed for this vehicle. As it has just been added to the inspection program, it is "Not applicable" as it was not peformed yet.
- Last performed at (meter): Represents the meter value when the inspection was last peformed.
- Next inspection: When this inspection will be due next. By default, it is set to the current date and current meter of the vehicle. If the value in this column appear in yellow, it means this inspection is due soon. If it appears in red, it means it is overdue.
- Create reminder: It is the number of days and mileage that is used to set the status to "Due soon".
Edit the frequency settings
To edit the frequency settings, just double click the inspection (or click on the "Edit" button), make your modifications then click "Save":
You can take a look at the "Reminders" tab. As our newly created inspection is "due soon", you can see that a reminder has been added to the list of active reminders: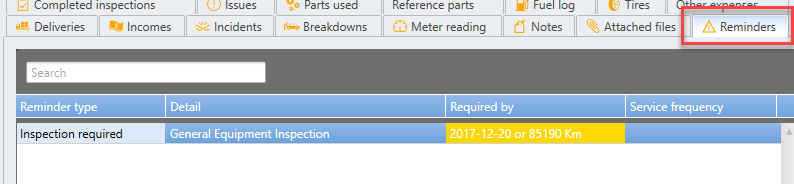
Let's go back to the "Scheduled inspections" tab. You can edit the new inspection form easily by double clicking the row or by using the "Edit" button. So let's change the "Next due date" for the reminder and let's disable the "500 km before due" value:
The result is that the inspection is not considered as "due soon" anymore, and the reminder disappeared from the "Reminders" tab: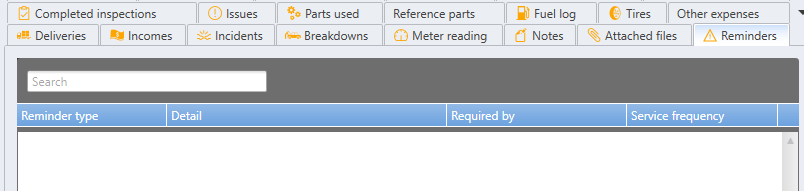
At this stage, you know how to create scheduled inspections for your vehicles. Now let's go a little further with this...
Print and/or fill out the form
Now you can print the inspection form and give it to the driver/inspector to complete it. Use these buttons to print or preview the form:
The printed form will look similar to this, depending on the printing options you selected:
When the inspector comes back with the form completed, you can enter it in the software by using this button (of course, the inspector could use a laptop to fill out the form directly within the software, so there would be no need to use paper form): 
The form will display on screen so you can enter the information:
Click the "Save" button when you are done. You will be prompted to enter comments for items that fails inspection. Those comments are optional unless the item has been set so it requires a comment if it fails (see the "How to create inspection forms" article for more details):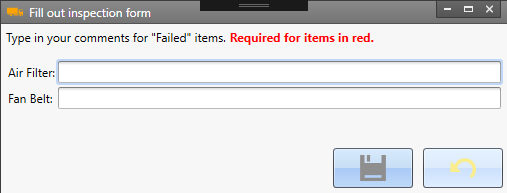
If there is "Failed" items, you will be prompted if you want to add those items to the list of "Issues" (see the "Issues" tab):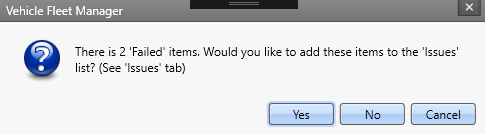
That's it. You have just created a "Completed inspection" record as well as two "Issues" records:
See the "Completed inspections" tab...
Then see the "Issues" tab...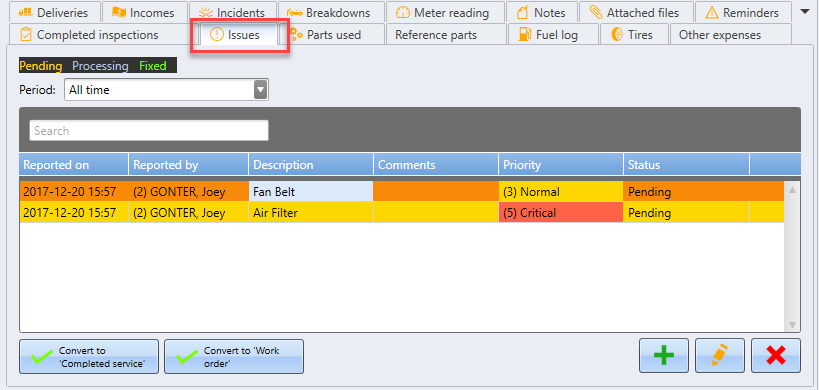
You can now choose to convert those newly created "Issues" to either "Completed services" or a "Work order" using those buttons:
If you want, you can access the "Completed inspection" and "Issues" of all the vehicle from the global management section. Note that "Issues" button will blink red when there is pending issues: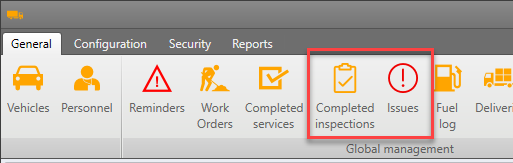
Congratulations!
You're done! You now know how to create and manage scheduled inspections.
Comments
0 comments
Article is closed for comments.